무엇을 테스트할까?
React 컴포넌트의 인터페이스와 렌더링, 유저와의 상호작용 이후에 변화하는 데이터(상태) 그리고 네비게이팅과 라우터 경로에 따른 렌더링 테스트를 할 것입니다.
UI 컴포넌트 테스트는 매우 상당히 복잡합니다. 우선, 조건에 따른 렌더링을 테스트합니다. props와 state가 조건으로 주어지며, 더 넓게 보면 브라우저의 종류와 viewport의 크기도 조건으로 고려합니다. 그리고, 유저에게 인터페이스를 제공하기 때문에 유저가 UI에 할 수 있는 모든 행동 시나리오를 테스트합니다. 이 경우 네이밍이나 단언 컨벤션은 TDD가 아닌 BDD를 따르는 것이 좋습니다. 보편 언어(Ubiquitous Language)를 사용하여 비개발자도 읽을 수 있도록 유저 입장에서 시나리오를 작성하는 것입니다.
또한 컴포넌트는 합성구조로 이루어져 있다는 점으로 인해 많은 stub or mock 객체들을 필요로 하게 됩니다. UI는 가장 낮은 단계에서 가장 강한 의존성을 가지는 계층이기 때문에 http request, redux store, stylesheet 등 외부에 의존성을 가지는 것들이 상당히 많습니다. 따라서 테스트를 위해 컴포넌트를 setup하기 위해 필요한 configuration도 복잡합니다.
유저가 UI와 상호작용을 하면 해당 UI가 도메인과 결합되어 있는 경우 데이터가 변화하는 시나리오가 많습니다. React에서는 이 데이터를 상태로서 관리하는데, 의존성을 편하게 관리하기 위해 상태 관리 라이브러리를 보편적으로 사용합니다.
여기서는 상태관리 라이브러리인 Redux를 테스트 하는 방법을 소개할 것입니다.
마지막으로 react-router를 네비게이팅(UI를 통한 url이동)과 url 경로(path) 변화에 따른 렌더링 테스트를 할 것입니다.
무엇을 테스트하지 않을까?
1. 스냅샷 테스트
컴포넌트 렌더링의 결과는 단언으로 self-validating 하는 것을 추구합니다. 따라서 스냅샷 테스팅 기법은 소개하지 않으려고 합니다. 스냅샷 테스트는 렌더링 결과를 파일로 저장하여 다음에 테스트할 때 렌더링 결과가 기존 결과와 다르면 차이점을 보여주고 update를 할 것인지 말 것인지 개발자가 수작업으로 판단하여 결과를 갱신해줘야 합니다. 개발자가 수작업으로 결과를 비교하면 개발자의 판단이 개입되며 이 판단은 100% 믿을 수가 없는 것이고 개발자의 작업 효율도 굉장히 떨어집니다. 따라서 저는 좋은 테스트는 self-validating 해야 한다고 믿습니다.
2. 리덕스 액션
리덕스는 flux 패턴으로 데이터가 단방향으로 흐릅니다. (action -> dispatch -> store -> view)
유저가 행하는 시나리오에 대해 테스트를 하는 BDD는 flux 패턴 전체를 커버합니다. 반면 각 모듈을 개발할 때마다 그 전에 테스트를 작성해야 하는 TDD는 action, dispatch, reducer 각각에 대해 유닛 테스트를 작성해야 하나 고민이 듭니다. 이에 대해 제가 내린 결론은 reducer에 대해서만 유닛 테스트를 작성하자입니다. action과 action 생성 함수는 typescript의 인터페이스를 잘 사용하고 있다면 굳이 테스트로 커버칠 코드가 없다고 느꼈습니다. dispatch는 UI와 결합되어있고 실제로 UI에서 호출하기 때문에 BDD로 커버하는게 더 유리하다고 생각합니다. 마찬가지로 action 또한 BDD로 커버가 됩니다. 반면 reducer는 데이터를 가공하는 로직을 담고 있기 때문에 유닛 테스트를 작성하는게 유리하다고 생각합니다. reducer는 순수함수기때문에 실제로 유닛 테스트를 작성하는게 매우 쉽기도 합니다.
프로젝트 시작
Create React App 으로 프로젝트를 시작하면 jest와 react/testing-library가 기본적으로 내장되어있습니다. 이 환경에서 실습을 하려고 합니다. 또한 typescript를 사용해 진행하겠습니다. 터미널에서 다음 명령어를 실행하여 프로젝트를 시작합니다.
npx create-react-app jest-react --template typescript
컴포넌트 렌더링 테스트
컴포넌트 렌더링 테스트를 self-validating 할 수 있는 테스트로 작성해보겠습니다. 테스트 방법은 다음과 같습니다.
1. default props와 함께 컴포넌트를 마운트합니다.
2. DOM query를 하여 얻은 실제값과 기대값을 비교합니다.
3. 비교 대상은 텍스트, 이미지 등 사용자에게 반드시 보여야 하는 요소들입니다.
예시로 score를 props로 받아 출력하는 Score 컴포넌트를 개발해보겠습니다.
인터페이스를 먼저 작성합니다.
* Score.tsx
export interface Props {
  score: number;
}

function Score({ score }: Props) {
  return <div>{score}</div>;
}

export default Score;
Score 컴포넌트는 score props 인터페이스를 가집니다. 렌더링 부분은 컴파일 에러 방지를 위해 임의로 div태그와 score값을 넣었습니다.
이제 테스트 코드를 작성합니다. 인터페이스를 임포트하여 인터페이스를 지키며 테스트를 작성합니다.
* Score.test.tsx
import { render, screen } from "@testing-library/react";
import Score, { Props } from "./Score";
describe("Score", () => {
const initialProps: Props = {
score: 0,
};
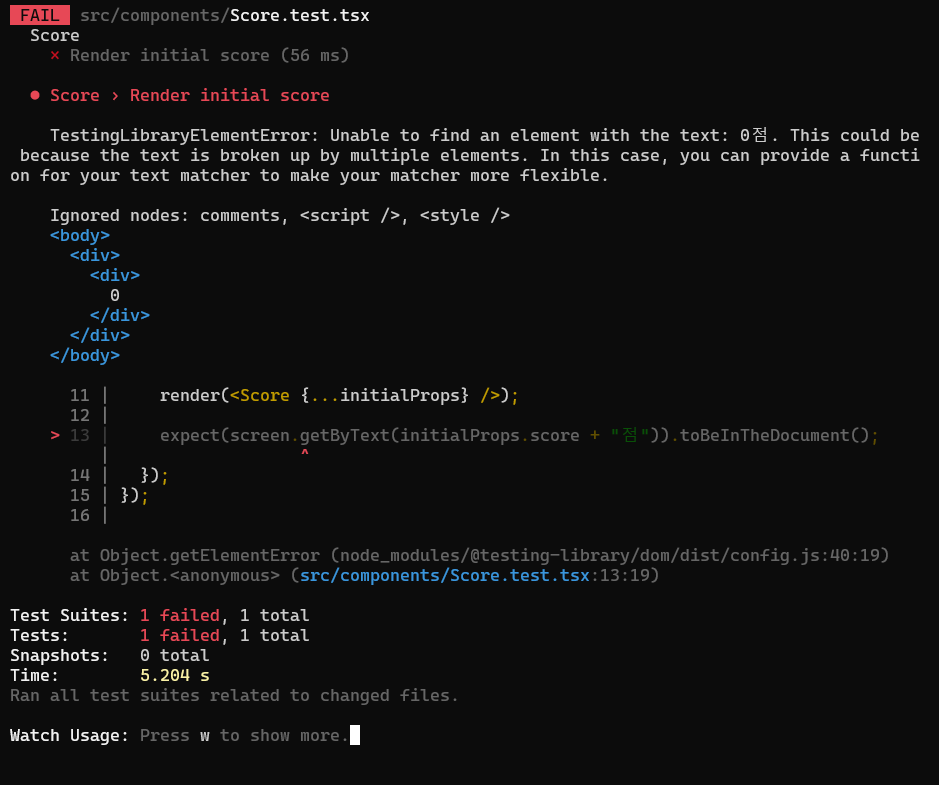
it("Render initial score", () => {
render(<Score {...initialProps} />);
expect(screen.getByText(initialProps.score + "점")).toBeInTheDocument();
});
});
이제 터미널에서 yarn test를 입력하여 테스트를 실행합니다. 본 코드 전에 테스트 코드를 먼저 작성했기 때문에 실패한 테스트가 나타납니다.
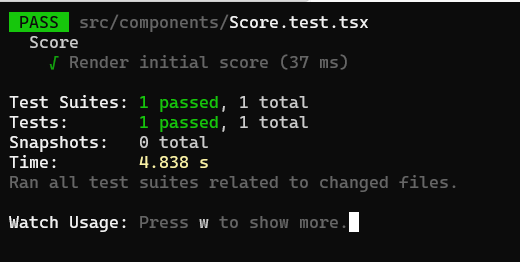
이제 테스트를 통과시키기 위해 본 코드를 마저 작성합니다. 간단한 예시기 때문에 "점"이라는 텍스트만 추가하면 테스트를 통과시킬 수 있습니다.
* Score.tsx
export interface Props {
  score: number;
}

function Score({ score }: Props) {
  return <div>{score}점</div>;
}

export default Score;
테스트가 통과된 모습입니다.
리덕스 테스트
리덕스 툴킷을 설치합니다.
yarn add @reduxjs/toolkit react-redux
리덕스는 서문에서 말했다시피 리듀서 함수만 테스트를 할 것입니다. 또한 redux toolkit을 사용하여 보일러 플레이트를 최소화할 것입니다. 먼저 store configuration코드를 작성할 것인데 redux toolkit 1.8.x 버전 기준으로 다음과 같으며 해당 코드는 redux 공식문서에 가이드되어있습니다.
* store/index.ts
import { configureStore } from "@reduxjs/toolkit";

export const configuration = {
  reducer: {},
};

export const store = configureStore(configuration);

// Infer the `RootState` and `AppDispatch` types from the store itself
export type RootState = ReturnType<typeof store.getState>;

export type AppDispatch = typeof store.dispatch;

export type ReduxAction<Payload> = {
  type: string;
  payload: Payload;
};
이제 score라는 데이터를 리덕스 스토어에서 관리하며, 어떤 액션을 디스패치하면 해당 score값을 더하는 flux패턴을 하나 만드려고 합니다.
score에 대한 flux패턴을 가지고 있는 store/score.ts 파일을 만들어 state타입, 액션과 액션 생성 함수 그리고 리듀서를 선언합니다.
* store/score.ts
import { createAction, createReducer } from "@reduxjs/toolkit";

import { ReduxAction } from ".";

// state 타입 정의
export type Score = number;

export type ScoreState = {
  score: Score;
};

// 액션 정의
export const actionTypes = {
  ADD: "SCORE/ADD",
};

// 액션 생성 함수
export const action = {
  addScore: createAction<number>(actionTypes.ADD),
};

// 초기 state
const initialState: ScoreState = {
  score: 0,
};

// 리듀서
export const reducer = {
  add: (state: ScoreState, action: ReduxAction<unknown>) => {},
};

const scoreReducer = createReducer(initialState, (builder) => {
  builder.addCase(action.addScore, reducer.add);
});

export default scoreReducer;
"SCORE/ADD"라는 액션에 대한 리듀서 함수는 redcuer.add입니다. 이제 reducer.add에 대한 테스트 코드를 작성할 것입니다. 원하는 기능은 새로운 숫자를 받았을 때 해당 수를 score에 더하는 것입니다. 초기 score 값 0에 1을 더하면 score 값이 1이 되는 정상값 테스트 케이스를 하나 추가하겠습니다.
* score.test.ts
import { reducer, ScoreState, Score, actionTypes } from "./score";
import { ReduxAction } from ".";

describe("score reducers", () => {
  let state: ScoreState = {
    score: 0,
  };

  beforeEach(() => {
    state = {
      score: 0,
    };
  });

  test("Given score is 0, When add score 1, Then score is 1", () => {
    const action: ReduxAction<Score> = {
      type: actionTypes.ADD,
      payload: 1,
    };

    reducer.add(state, action);

    expect(state.score).toEqual(1);
  });
});
이제 해당 테스트를 통과시키기 위해 리듀서 함수를 작성합니다.
* store/score.ts
export const reducer = {
  add: (state: ScoreState, action: ReduxAction<Score>) => {
    state.score += action.payload;
  },
};
이제 테스트가 통과합니다.
Ajax 테스트
ajax를 이용한 http 통신 테스트는 mock객체를 이용합니다. 우리가 개발 중인 리액트 애플리케이션은 외부 API를 통제할 수 없기 때문에 외부 API는 mock 객체로 만들어서 테스트를 합니다. 따라서 어떤 요청을 보낼 때 어떤 응답을 받을 것인지 mock객체로 미리 작성해줍니다.
외부 API가 정상적으로 동작하는지 아닌지는 우리가 테스트해야 할 관심사가 아닙니다. 따라서 ajax 테스트를 따로 작성하기보다는 유저 입장에서의 시나리오를 작성하는 컴포넌트의 기능 테스트에서 ajax 요청이 로직 안에 들어간다면 해당 요청을 mocking 하는 것이 우리가 할 일입니다. 바로 뒤에 나올 컴포넌트 기능 테스트에 예제가 있습니다.
컴포넌트 기능 테스트
이제 리덕스와 ajax에 의존하는 컴포넌트를 만들어서 컴포넌트의 통합 테스트를 하려고 합니다.
1. 우선 Score 컴포넌트의 상위 컴포넌트인 ScoreBoard 컴포넌트를 만들겠습니다. 이 컴포넌트는 score값을 리덕스로 관리하며 Score 컴포넌트에게 score값을 props로 내려줍니다. 또한 +버튼을 가지고 있어 해당 버튼을 누르면 아까 만들었던 SCORE/ADD 액션이 dispatch 되도록 하겠습니다.
2. 또한 ScoreBoard컴포넌트는 외부 API에 요청을 보내 초기 score 값을 받아오도록 하겠습니다. 이를 위해 리덕스에는 또 다른 액션과 리듀서가 추가되어야 합니다.
다소 복잡해지는데 1번부터 차근차근 진행하겠습니다.
먼저 ScoreBoard 컴포넌트와 테스트 파일을 만듭니다. 그리고 + 텍스트를 렌더링하는지 테스트합니다.
* ScoreBoard.test.tsx
import { render, screen } from "@testing-library/react";

import ScoreBoard from "./ScoreBoard";

describe("ScoreBoard", () => {
  it("Render add button", () => {
    render(<ScoreBoard />);

    expect(screen.getByText("+")).toBeInTheDocument();
  });
});
* ScoreBoard.tsx
function ScoreBoard() {
  return (
    <div>
      <button type="button">+</button>
    </div>
  );
}

export default ScoreBoard;
이제 버튼을 누를 때마다 score가 5씩 증가하도록 만들겠습니다. score는 컴포넌트 내부가 아닌 리덕스 스토어 안에 있기 때문에, test 파일에서 컴포넌트를 마운트할 때, store를 provider로 제공하도록 해야 합니다. 또한 userEvent를 이용해 +에 대해 클릭이벤트를 발생시킨 후 변경된 score를 렌더링하는지 테스트합니다.
* ScoreBoard.test.tsx
import { render, screen } from "@testing-library/react";
import userEvent from "@testing-library/user-event";
import { Provider } from "react-redux";
import { configureStore } from "@reduxjs/toolkit";

import ScoreBoard from "./ScoreBoard";
import { configuration } from "../store";

describe("ScoreBoard", () => {
  it("Render add button", () => {
    render(
      <Provider store={configureStore(configuration)}>
        <ScoreBoard />
      </Provider>
    );

    expect(screen.getByText("+")).toBeInTheDocument();
  });

  test("Given score is 0, When click +, Then score is 5", () => {
    render(
      <Provider store={configureStore(configuration)}>
        <ScoreBoard />
      </Provider>
    );
    expect(screen.getByText("0점")).toBeInTheDocument();

    userEvent.click(screen.getByText("+"));

    expect(screen.getByText("5점")).toBeInTheDocument();
  });
});
store에 score 리듀서를 추가하기 위해 configuration을 수정합니다.
* store/index.ts
export const configuration = {
  reducer: {
    score: scoreReducer,
  },
};
ScoreBoard 컴포넌트에 리덕스 로직을 결합합니다.
* ScoreBoard.tsx
import { useDispatch, useSelector } from "react-redux";

import Score from "./Score";
import { action } from "../store/score";
import { RootState, AppDispatch } from "../store";

function ScoreBoard() {
  const score = useSelector((state: RootState) => state.score.score);
  const dispatch = useDispatch<AppDispatch>();

  const onClick = () => {
    dispatch(action.addScore(5));
  };

  return (
    <div>
      <button type="button" onClick={onClick}>
        +
      </button>
      <Score score={score} />
    </div>
  );
}

export default ScoreBoard;
리덕스의 flux 패턴 전체 테스트는 이렇게 컴포넌트 기능 테스트 안에 녹아들게 됩니다. 이것은 컴포넌트가 리덕스와 가지는 결합성 때문입니다.
다음으로 ajax 통신을 위해 axios 모듈을 설치합니다.
yarn add axios
다음으로 외부 API를 통해 score 값을 받아오도록 리덕스에 로직을 추가합니다.
* store/score.ts
import {
  createAction,
  createReducer,
  createAsyncThunk,
} from "@reduxjs/toolkit";
import axios from "axios";

import { ReduxAction } from ".";

export type Score = number;

export type ScoreState = {
  score: Score;
};

export const actionTypes = {
  ADD: "SCORE/ADD",
  GET: "SCORE/GET",
};

export const action = {
  addScore: createAction<number>(actionTypes.ADD),
  getScore: createAsyncThunk(
    actionTypes.GET,
    async (_, { rejectWithValue }) => {
      return axios
        .get("http://localhost:4000/score")
        .then((response) => response.data.score);
    }
  ),
};

const initialState: ScoreState = {
  score: 0,
};

export const reducer = {
  add: (state: ScoreState, action: ReduxAction<Score>) => {
    state.score += action.payload;
  },
  get: (state: ScoreState, action: ReduxAction<Score>) => {
    state.score = action.payload;
  },
};

const scoreReducer = createReducer(initialState, (builder) => {
  builder
    .addCase(action.addScore, reducer.add)
    .addCase(action.getScore.fulfilled, reducer.get);
});

export default scoreReducer;
리듀서의 테스트 케이스는 다음과 같습니다.
* store/score.test.ts
it("get initial score 100", () => {
    const action: ReduxAction<Score> = {
      type: actionTypes.GET,
      payload: 100,
    };

    reducer.get(state, action);

    expect(state.score).toEqual(100);
  });
});
이제 마지막으로 ScoreBoard가 마운트될 때 요청을 보내 초기 score값을 가져오도록 하겠습니다. ScoreBoard 테스트 케이스를 추가합니다. 그전에 axios mock 객체를 쉽게 만들어주는 라이브러리인 axios-mock-adapter를 설치합니다.
yarn add -D axios-mock-adapter
* ScoreBoard.test.tsx
import { render, screen } from "@testing-library/react";
import userEvent from "@testing-library/user-event";
import { Provider } from "react-redux";
import { configureStore } from "@reduxjs/toolkit";
import axios from "axios";
import MockAdapter from "axios-mock-adapter";

import ScoreBoard from "./ScoreBoard";
import { configuration } from "../store";

describe("ScoreBoard", () => {
  // (생략)

  it("get initial score 100 and api be called once", async () => {
    const mock = new MockAdapter(axios, { delayResponse: 100 });
    mock.onGet("http://localhost:4000/score").reply(200, { score: 100 });

    render(
      <Provider store={configureStore(configuration)}>
        <ScoreBoard />
      </Provider>
    );

    await screen.findByText("100점");
    expect(mock.history.get.length).toBe(1);
  });
});
mock 객체를 만들어서 http://localhost:4000/score로 요청을 보내면 { score: 100 } 데이터를 응답받도록 합니다.
또한 mock 객체는 요청을 받은 후 응답을 내리기까지 100ms의 딜레이를 가집니다. (delayResponse: 100)
그리고 screen.findByText() 메서드는 해당 값을 찾을 때까지 기다립니다.
mock 객체는 받은 요청들을 history에 저장합니다. 요청이 불필요하게 여러 번 가지 않도록 하기 위해 1회만 요청을 하는지도 테스트합니다.
expect(mock.history.get.length).toBe(1);
테스트를 통과시키기 위해 ScoreBoard 컴포넌트가 마운트되면 해당 api로 요청을 보내도록 만듭니다.
* ScoreBoard.tsx
import { useEffect } from "react";
import { useDispatch, useSelector } from "react-redux";

import Score from "./Score";
import { action } from "../store/score";
import { RootState, AppDispatch } from "../store";

function ScoreBoard() {
  const score = useSelector((state: RootState) => state.score.score);
  const dispatch = useDispatch<AppDispatch>();

  const onClick = () => {
    dispatch(action.addScore(5));
  };

  useEffect(() => {
    dispatch(action.getScore());
  }, [dispatch]);

  return (
    <div>
      <button type="button" onClick={onClick}>
        +
      </button>
      <Score score={score} />
    </div>
  );
}

export default ScoreBoard;
ScoreBoard 컴포넌트가 마운트되면 getScore를 dispatch하고 이때 정의된 액션 생성 함수에서 API로 요청을 보내는데 요청에 대해 실제 응답값을 받는 것이 아니라 mock객체가 { score: 100 }를 응답합니다. 이것을 리듀서가 처리하고 score 값은 100이 되어 컴포넌트는 리렌더링 합니다.
localhost:4000 서버를 띄워놓지 않았기에 터미널에서 이에 대한 에러를 뱉을 수 있지만, 우리는 그냥 localhost:4000이라는 API 서버가 있다고 가정하고 무시하고 진행합니다.
응답이 실패하는 경우에 대해 테스트는 다음과 같습니다.
응답이 실패하면 '로딩 실패'라는 텍스트를 띄우겠습니다.
test("When fail to get initial score, Then show error message and api be called once", async () => {
  const mock = new MockAdapter(axios, { delayResponse: 100 });
  mock.onGet("http://localhost:4000/score").reply(500);

  render(
    <Provider store={configureStore(configuration)}>
      <ScoreBoard />
    </Provider>
  );

  await screen.findByText("로딩 실패");
  expect(mock.history.get.length).toBe(1);
});
* ScoreBoard.tsx
import { useState } from "react";

// (생략)

function ScoreBoard() {
  // (생략)
  const [errorMessage, setErrorMessage] = useState<string>("");

  // (생략)

  useEffect(() => {
    dispatch(action.getScore())
      .unwrap()
      .catch((error) => {
        setErrorMessage("로딩 실패");
      });
  }, [dispatch]);

  return (
    <div>
      <button type="button" onClick={onClick}>
        +
      </button>
      <Score score={score} />
      <div>{errorMessage && errorMessage}</div>
    </div>
  );
}
리액트 라우터 테스트
리액트 라우터를 설치합니다.
yarn add react-router-dom
두 가지 path를 만드려고 합니다.
우선 root인 "/" 경로에는 score 페이지로 이동할 수 있는 링크를 가집니다.
그리고 "/score" 경로는 ScoreBoard 컴포넌트를 렌더링하도록 하겠습니다.
루트 경로에 렌더링해줄 Home 컴포넌트를 만들겠습니다.
* Home.test.tsx
import { render, screen } from "@testing-library/react";

import Home from "./Home";

describe("Home", () => {
  it("Render initial score", () => {
    render(<Home />);

    expect(screen.getByText("go to score")).toBeInTheDocument();
  });
});
* Home.tsx
import { Link } from "react-router-dom";

function Home() {
  return <Link to="/score">go to score</Link>;
}

export default Home;
react-router-dom의 api를 사용하고 있기 때문에 테스트를 통과하지 못합니다. 테스트 코드에서 location context를 제공하도록 코드를 변경합니다.
* Home.test.tsx
import { render, screen } from "@testing-library/react";
import { createMemoryHistory } from "history";
import { Router } from "react-router-dom";

import Home from "./Home";

describe("Home", () => {
  it("Render initial score", () => {
    const history = createMemoryHistory();

    render(
      <Router location={history.location} navigator={history}>
        <Home />
      </Router>
    );

    expect(screen.getByText("go to score")).toBeInTheDocument();
  });
});
이제 링크를 누를 때 "/score"경로로 이동하는 테스트 케이스를 추가합니다.
* Home.test.tsx
test("When click 'go to score' link, Then navigate to '/score'", () => {
  const history = createMemoryHistory();

  render(
    <Router location={history.location} navigator={history}>
      <Home />
    </Router>
  );

  userEvent.click(screen.getByText("go to score"));

  expect(history.location.pathname).toBe("/score");
});
컴포넌트는 준비되었습니다. 이제 라우트 파일을 하나 따로 만들 것이고, 라우트 파일에 대한 테스트 케이스는 두 가지가 추가됩니다.
"/"경로에 진입했을 때 렌더링 상태와 "/score"경로에 진입했을 때 렌더링 상태입니다.
* MainRoutes.test.tsx
import { render, screen } from "@testing-library/react";
import { createMemoryHistory } from "history";
import { Router } from "react-router-dom";
import { Provider } from "react-redux";
import { configureStore } from "@reduxjs/toolkit";

import { configuration } from "./store";
import MainRoutes from "./MainRoutes";

describe("MainRoutes", () => {
  test("'/' render Home", () => {
    const history = createMemoryHistory();
    history.push("/");

    render(
      <Router location={history.location} navigator={history}>
        <Provider store={configureStore(configuration)}>
          <MainRoutes />
        </Provider>
      </Router>
    );

    expect(screen.getByTestId("home")).toBeInTheDocument();
  });

  test("'/score' render ScoreBoard", () => {
    const history = createMemoryHistory();
    history.push("/score");

    render(
      <Router location={history.location} navigator={history}>
        <Provider store={configureStore(configuration)}>
          <MainRoutes />
        </Provider>
      </Router>
    );

    expect(screen.getByTestId("score-board")).toBeInTheDocument();
  });
});
어떤 요소를 렌더링할지는 각 컴포넌트 테스트에서 이미 했기 때문에, 라우터 테스트에서는 각 경로에 따라 어떤 컴포넌트를 렌더링하는지를 테스트합니다. 따라서 Home 컴포넌트와 ScoreBoard 컴포넌트에 data-testid를 붙여줍니다
* Home.tsx
function Home() {
  return (
    <Link data-testid="home" to="/score">
      go to score
    </Link>
  );
}
* ScoreBoard.tsx
// (생략)
  return (
    <div data-testid="score-board">
      <button type="button" onClick={onClick}>
        +
      </button>
      <Score score={score} />
      <div>{errorMessage && errorMessage}</div>
    </div>
  );
MainRoutes 컴포넌트로 테스트 케이스를 통과시킵니다. 원래는 하나의 테스트케이스를 쓸 때마다 테스트를 통과시키기 위한 코드를 구현하는 것이 바람직하지만 코드를 올리기 위한 편의 때문에 한 번에 두 케이스를 써서 올렸습니다.
* MainRoutes.tsx
import { Routes, Route } from "react-router-dom";

import Home from "./components/Home";
import ScoreBoard from "./components/ScoreBoard";

function MainRoutes() {
  return (
    <Routes>
      <Route path="/" element={<Home />} />
      <Route path="score" element={<ScoreBoard />} />
    </Routes>
  );
}

export default MainRoutes;
마무리
여기까지 각 유닛을 개발하는 과정에서 테스트 코드를 어떤 식으로 작성할지 봤습니다. 그런데 아직 최상위 컴포넌트인 App.tsx를 개발하지 않았습니다. 최상위 컴포넌트를 테스트한다는 것은 모든 컴포넌트가 조합된 상태에서의 통합 테스트를 의미하기 때문에 따로 다루지 않았습니다. 저는 이에 대한 테스트는 E2E 테스트를 하는 것이 적합하다고 보고 있고 E2E 테스트는 지금까지 작성한 유닛 테스트와는 독립적으로 작성하는 것이기에 이번 포스팅에서 같이 다루지 않는 것이 덜 혼란스럽겠다는 생각입니다.
모든 컴포넌트가 합성된 통합 테스트를 하지 않은 것과 더불어 또 아직 하지 않은 것이 있습니다. 지금 테스트 코드는 컴포넌트를 셋업 하는데 많은 양의 코드를 중복 사용하고 있습니다. 이 중복을 제거하여 보일러 플레이트를 간략화하는 작업을 해놓아야 앞으로 테스트를 계속 추가하는데 공수가 줄어들 것입니다.
전체 코드는 깃허브 링크에서 볼 수 있습니다.


최근댓글